Calendar widget
What is the Calendar object?
The Calendar object resides in an Open Application Server (OAS), Engine or Advanced Application Field Equipment Controller (FAC), and is the internal basis for the calendar functionality of the scheduling feature. Starting at Metasys UI Release 5.0, you can create a calendar object directly in Metasys UI. See Creating and deleting objects for more information about creating objects.
You use a calendar to define a list of holidays or special events that can then be used in multiple schedule objects to define different events that need to occur. The schedule executes an exception schedule based on the list of dates defined in the calendar. For example, use a calendar to define different building operations on days when the building is not occupied. A schedule can reference calendars on any Engine or FAC on the site.
What is the Calendar widget?
The Calendar widget is a graphical representation of the Calendar object. You can view and edit a calendar object with this widget. You can also reference a global calendar and add a calendar reference to a schedule.
Who can access the Calendar widget?
All users can access this widget.
How can I access the Calendar widget?
The Calendar widget appears on the Building Network dashboard in Metasys UI Online any time you select a Calendar object from the network tree.
What is the layout of the Calendar widget?

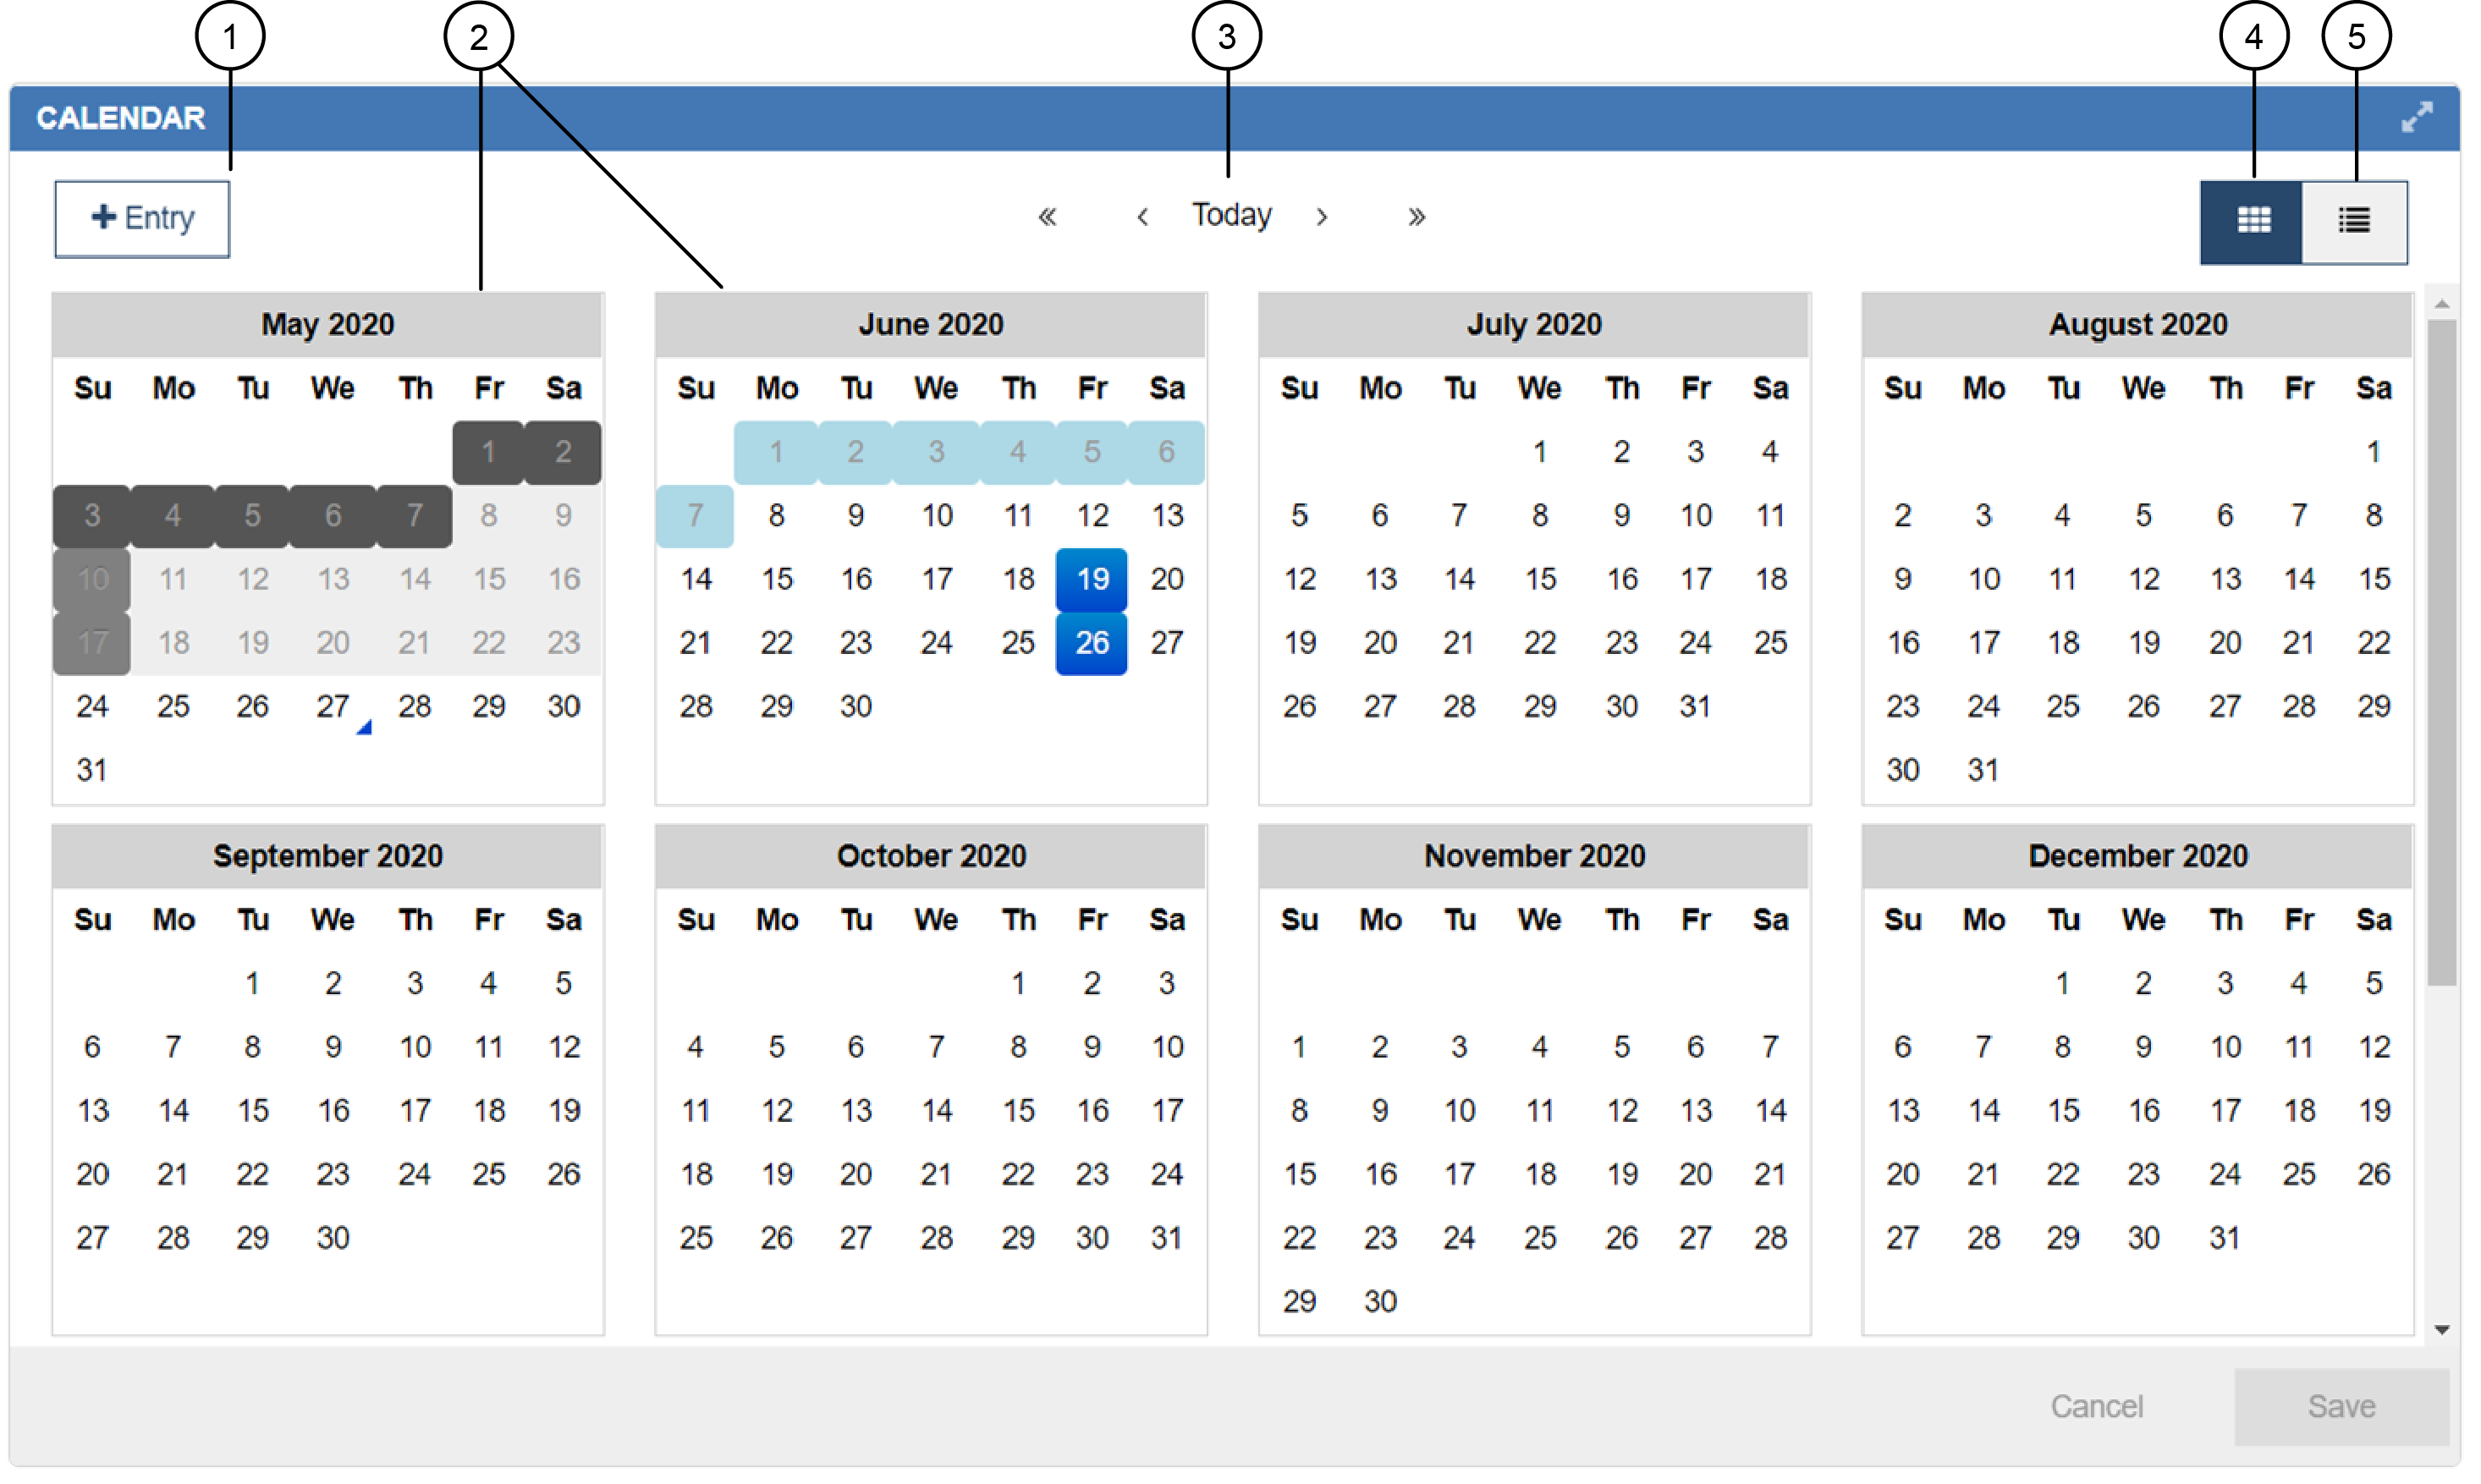
| Number | Name | Description |
|---|---|---|
| 1 | +Entry button | Click or tap this button to create a new calendar entry. |
| 2 | Calendar tiles | The Calendar widget displays individual tiles for each month. Active days are highlighted, while inactive days are not highlighted. See What does the different highlighting in the calendar mean? for more details. |
| 3 | Paging arrows | Use these arrows in the Calendar View to shift the content back by one month (<), forward by one month (>), back by one year (<<), or forward by one year (>>). Click Today to return to the current date. |
| 4 | Calendar View icon | Click or tap this icon to switch the display to the Calendar View, as shown in the figure. You can create new entries in the Calendar View, but you have to switch to the List View to edit or delete entries. |
| 5 | List View icon | Click or tap this icon to switch the display to the List View. The List View shows the same data as the Calendar View in the form of a list. The information is displayed in columns, including Month, Week of Month, Day, Day of Week, and Year. You can add a new entry and edit or delete an existing entry in the List View. |
What does the different highlighting in the calendar mean?
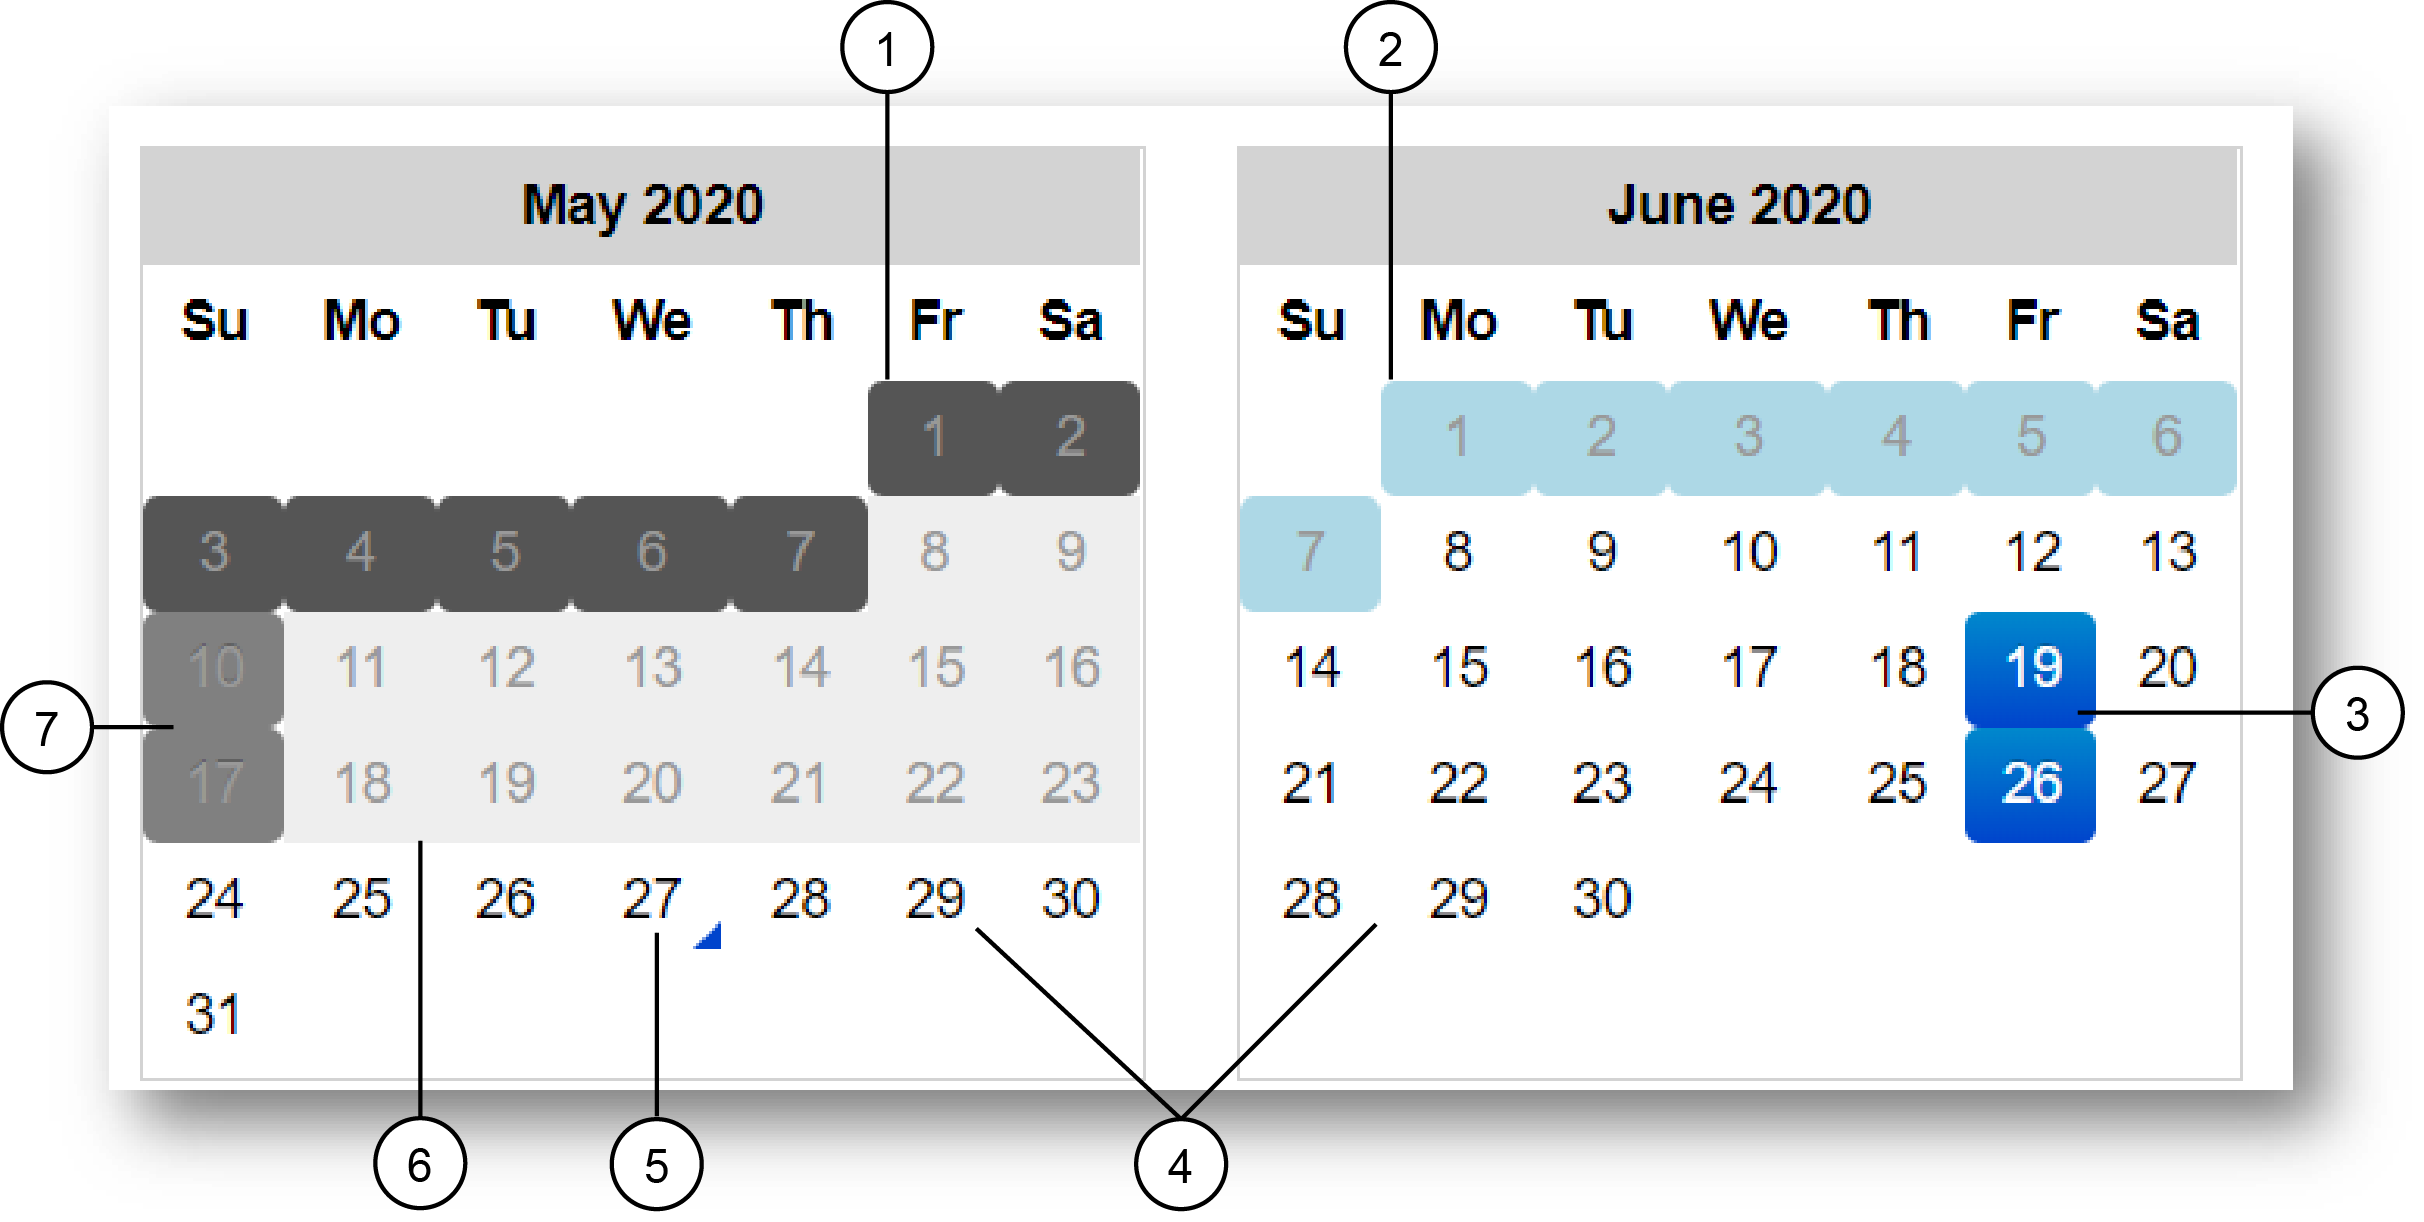
The following figure and table outline the different highlighting types.

| Number | Highlighting types | Description |
|---|---|---|
| 1 | Dark gray | Active days for past weeks are highlighted with dark gray if they are recurring. Recurring or wild-carded calendar entries are entries that have Any selected for day, month, or year. See How do I create a recurring calendar entry? for information about creating recurring entries. |
| 2 | Light blue | Active days for the current and future weeks are highlighted with light blue if they are recurring. |
| 3 | Dark blue | Active days for the current and future weeks are highlighted with dark blue if they are explicitly defined. Explicitly defined calendar entries are entries with a specific date or date range. |
| 4 | White background, no highlighting | Inactive days for the current and future weeks use a white background with no highlighting. |
| 5 | Triangle | “Today” is denoted by a triangle on the date in the lower-right corner. The triangle is a contrasting color and changes depending on the background color. A dark blue triangle appears on white background. A white triangle appears on dark blue background. A dark blue triangle appears on light blue background. |
| 6 | Light gray background, no highlighting | Inactive days for past weeks use a very light gray background with no highlighting. |
| 7 | Medium gray | Active days for past weeks are highlighted with medium gray if they are explicitly defined. |
How do I create a new calendar entry for explicitly-defined dates?
You can create a new calendar entry for explicitly-defined dates in two ways:
- Click or tap on the day for which you want to create an entry directly in the calendar.
- Select Date, Date Range, or Week and Day from the main drop-down list in the upper left of the New Calendar Entry window.
- Select a specific month, day, year, and day of week, as appropriate, from the various drop-down lists.
- Click or tap Entry+ in the upper left of the Calendar widget.
- Select Date, Date Range, or Week and Day from the main drop-down list in the upper left of the New Calendar Entry window.
- Select a specific month, day, year, and day of week, as appropriate, from the various drop-down lists.
How do I create a recurring calendar entry?
- Click or tap Entry+ in the upper left of the Calendar widget.
- Select Date, Date Range, or Week and Day from the main drop-down list in the upper left of the New Calendar Entry window.
- Use the wild-carding option Any for month, day, year, day of week, as appropriate.
Example 1: To create a recurring entry for New Year's Day select Date in the upper left of the New Calendar Entry window, and then select Month=January; Day=1; Year=Any; Day of Week=Any.
Example 2: To create a recurring entry for the last Friday of every month, select Week and Day in the upper left of the New Calendar Entry window, and then select Month=Any; Week of Month=Last; Day of Week=Friday.
How do I update multiple calendars at once?
You can reference a global calendar to update multiple local calendars. Any calendar can become a global calendar. With a global calendar, you can make facility-wide changes to calendars, such as defining holidays. When you edit the values of the global calendar object, the dates automatically download into all the local calendars.
- Open the Building Network dashboard.
- Click or tap on the local calendar in the network tree.
- Open the Details widget of the local calendar. Note: If the Details widget does not appear on Page 1 of the dashboard, click the Page 1 drop-down list in the upper-right corner of the dashboard and select the page that shows the Details widget.
- In the Focus tab of the Details widget, go to the Peer to Peer section.
- Edit the value for Global Calendar Object Reference by clicking or tapping the hyperlink next to Object Name. The Select Network Item window opens.
- Select the calendar that you want to be the global calendar, referenced by your local calendar. You can select a calendar object only. All other objects appear grayed out and you cannot select them.
How do I add a calendar to a schedule?
- Navigate to the Schedule widget of the schedule that you want to add the calendar to.
- Click + ADD EXCEPTION in the bottom left of the Schedule widget. The Add Exception window opens.
- Select Calendar Reference.
- Click NEXT.
- Click on the link under Calendar Reference and select the
calendar that you want to add from the network tree. Note: You can select a calendar object only. All other objects appear grayed out and you cannot select them.
- Click SAVE.
- Select the required Precedence from the drop-down list.
Note: Assign a precedence level (1–16, where 1 receives the highest precedence) to each exception, regardless of type, to determine the order of execution. If you define two or more exceptions for the same date, the exception with the highest precedence executes.
- Click NEXT.
- Click ADD EVENT next to Exception Events and select a start time, stop time, and value.
- Click NEXT.
- Review the effective schedule in the PREVIEW window.
- Click SAVE. The schedule now shows the calendar entries.
Is the Calendar widget supported on all devices?
Yes, the Calendar widget is supported on desktop, tablets, and smartphones.
