User Management
What is the User Management feature?
The User Management feature facilitates the creation and management of users and their roles, category-based permissions, and privileges directly in Metasys UI Online, without the need to install software on client machines. Administrators can create and manage user details for Active Directory and Metasys local users. Starting at Metasys UI Release 5.0, Active Directory includes Microsoft® Active Directory Federation Services (ADFS), including two-factor authentication (2FA) when the ADFS Server is configured for 2FA, in addition to Active Directory LDAP authentication. Refer to the Network and IT Guidance Technical Bulletin (LIT-12011279) for information about configuring an ADFS server for your Metasys site.
The User Management feature is also available in the Metasys Site Management Portal (SMP), but over time it will be available in Metasys UI Online only.
Who can access the User Management feature?
Only administrators can access the User Management feature. All users can view and edit certain information that relates to their specific user details in My Profile. You do not require a license to access User Management.
However, the ADFS for AD Integration and 2FA feature needs to be licensed. This add-on feature always appears in the Software Manager whenever Metasys UI Online is installed. The name of this feature license in the Software Manager is ADFS Authentication for Metasys. Refer to Software Manager Help (LIT-12012389) for more information about software licensing.
A user can access the Building Network tree in the Metasys UI only if the user has the User Can View the Item Navigation Tree (Default Tree) property selected in the User Details tab in the User Management feature in Metasys UI, or in their User Properties in SMP. For more information, refer to the Security Administrator System Technical Bulletin (LIT-1201528).
How can I access the User Management feature?
- Open the User menu.
- Tap or click Administrative Tasks.
- Tap or click User Management.
What can I do with the User Management feature in Metasys UI Online?
- Add, edit, and delete Metasys administrators.
- Add, edit, and delete Active Directory users. Starting at Metasys UI Release 5.0, this includes enabling Microsoft® Active Directory Federation Services (ADFS) for two-factor authentication (2FA).
- Duplicate a Metasys user to create an Active Directory user and duplicate an Active Directory user to create a Metasys user.
- Add, edit, and delete Metasys API users.
- Create, edit, delete, and assign roles to Metasys users.
- Assign authorization category permissions and system privileges to users and roles.
- Navigate to Space Authorization to authorize spaces for users.
- Apply system configurations and account policies to any user.
- Filter users based on role, type, last login, and status.
- Filter roles based on system privileges, access categories, and permissions.
What is the layout of the User Management feature?

| Number | Name | Description | |
|---|---|---|---|
| 1 | Users tab | This
is the default tab. You can see information that relates to all
users. If there are more than 25 users listed, navigate to the
next page to see more users. Tap or click
Next, or the relevant page number, in
the bottom-left of the screen to navigate to the next page. Tap
or click Previous, or the relevant page
number, to navigate to a previous page. Note: On a smartphone,
select Users, Roles, or Setup from the
Users drop-down in the upper-left
of the screen. |
|
| 2 | Roles tab | Lists the role name, description of each role, and the number of users that are assigned this role. You can also edit roles, create a duplicate role, and delete a role in this tab. See also What is the layout of the Roles tab? | |
| 3 | Setup tab | Configure the settings for Active Directory users. See also What is the layout of the Setup tab? | |
| 4 | Export icon | Exports a User Report of the users to a
.csv or .pdf file.
Note: The export functionality is supported on desktop
platforms only. |
|
| 5 | User search | Search for a user name. | |
| 6 | Filter menu | Filter options include Role, Type, Last Login, and Status. See also How do I use filters in the User Management feature? What filters are available? | |
| 7 | Actions column |  |
Edit the user. When you tap or click this icon, you can edit the User Details, Account Settings, Timesheet details, and you can edit the Category Access permissions for a user. How do I edit a user? What are my edit options? |
 |
Configure spaces. When you tap or
click this icon, you are redirected to the Space Authorization window. Note: This icon
does not appear on smartphones, as Space Authorization is
supported on desktop and tablets only. |
||
 |
Duplicate the
user. When you tap or click this icon, the Duplicate User window opens.
Select the settings you want to copy and enter a username and
password. Starting at Metasys UI Release 5.0, you can
duplicate a Metasys user to create an Active Directory
user, and you can duplicate an Active Directory user to create
a Metasys user. Note: If the Active Directory option
is disabled in the Type drop-down
menu in the Duplicate User window,
enable and configure Active Directory/LDAP or ADFS in the
User Management Setup tab.
|
||
 |
Delete the user. When you tap or click this icon, the Delete User window opens. You can confirm if you really want to delete the user. | ||
| 8 | Status column | Shows
the status of the users. For example, Active, Disabled, Locked
Out, or Expired. Note: On a smartphone, the status appears
underneath the username. |
|
| 9 | Last Login column |
Shows the last login time of the users. The Dormant User icon appears next to dormant users.
|
|
| 10 | Type column | Lists the user type. For example, Metasys or Active Directory. | |
| 11 | Role column | Lists
the roles of the users. Note: When a user has more than one
role, this field states the number of roles. Tap or click on
the number to see all roles listed in a pop-up
window. |
|
| 12 | Email column | Lists the email addresses of the users. | |
| 13 | Full Name column | Lists the full names of the users. | |
| 14 | Username column | Lists the usernames of the users. This column is sortable. | |
| 15 | Add user button | Tap or click to create a new user. See also How do I create a new user in the User Management feature? | |
What is the layout of the Roles tab?

| Number | Name | Description | |
|---|---|---|---|
| 1 | Add role button | Tap or click to create a new role. See also How do I create a new role in the User Management feature? | |
| 2 | Export icon | Exports a Role Report of the users to a
.csv or .pdf file.
Note: The export functionality is supported on desktop
platforms only. |
|
| 3 | Role search | Search for a role. | |
| 4 | Filter menu | Filter options include System Privileges, Access Categories, and Permissions. See also How do I use filters in the User Management feature? What filters are available? | |
| 5 | Actions column |  |
Edit the role. When you tap or
click this icon, you can edit the Role
Details and you can edit the Category
Access permissions for a role. For more details
see How do I edit a role? What are my edit options? Note: The edit functionality is supported on
desktop platforms only. |
 |
Duplicate the role. When you tap or
click this icon, the Duplicate Role
window opens. Select which settings you wish to copy and enter a
role name and description. Note: The duplicate functionality is
supported on desktop platforms only. |
||
 |
Delete the role. When you tap or
click this icon, the Delete Role window
opens. You can confirm if you really want to delete the role.
Note: The delete functionality is supported on desktop
platforms and tablets only. |
||
| 6 | Users column | Lists the number of users that are assigned this role. When you tap or click on the number, a window with the role details and category access information opens. | |
| 7 | Description column | Lists the group that the role belongs to. | |
| 8 | Role name | Lists the role names. | |
What is the layout of the Setup tab?
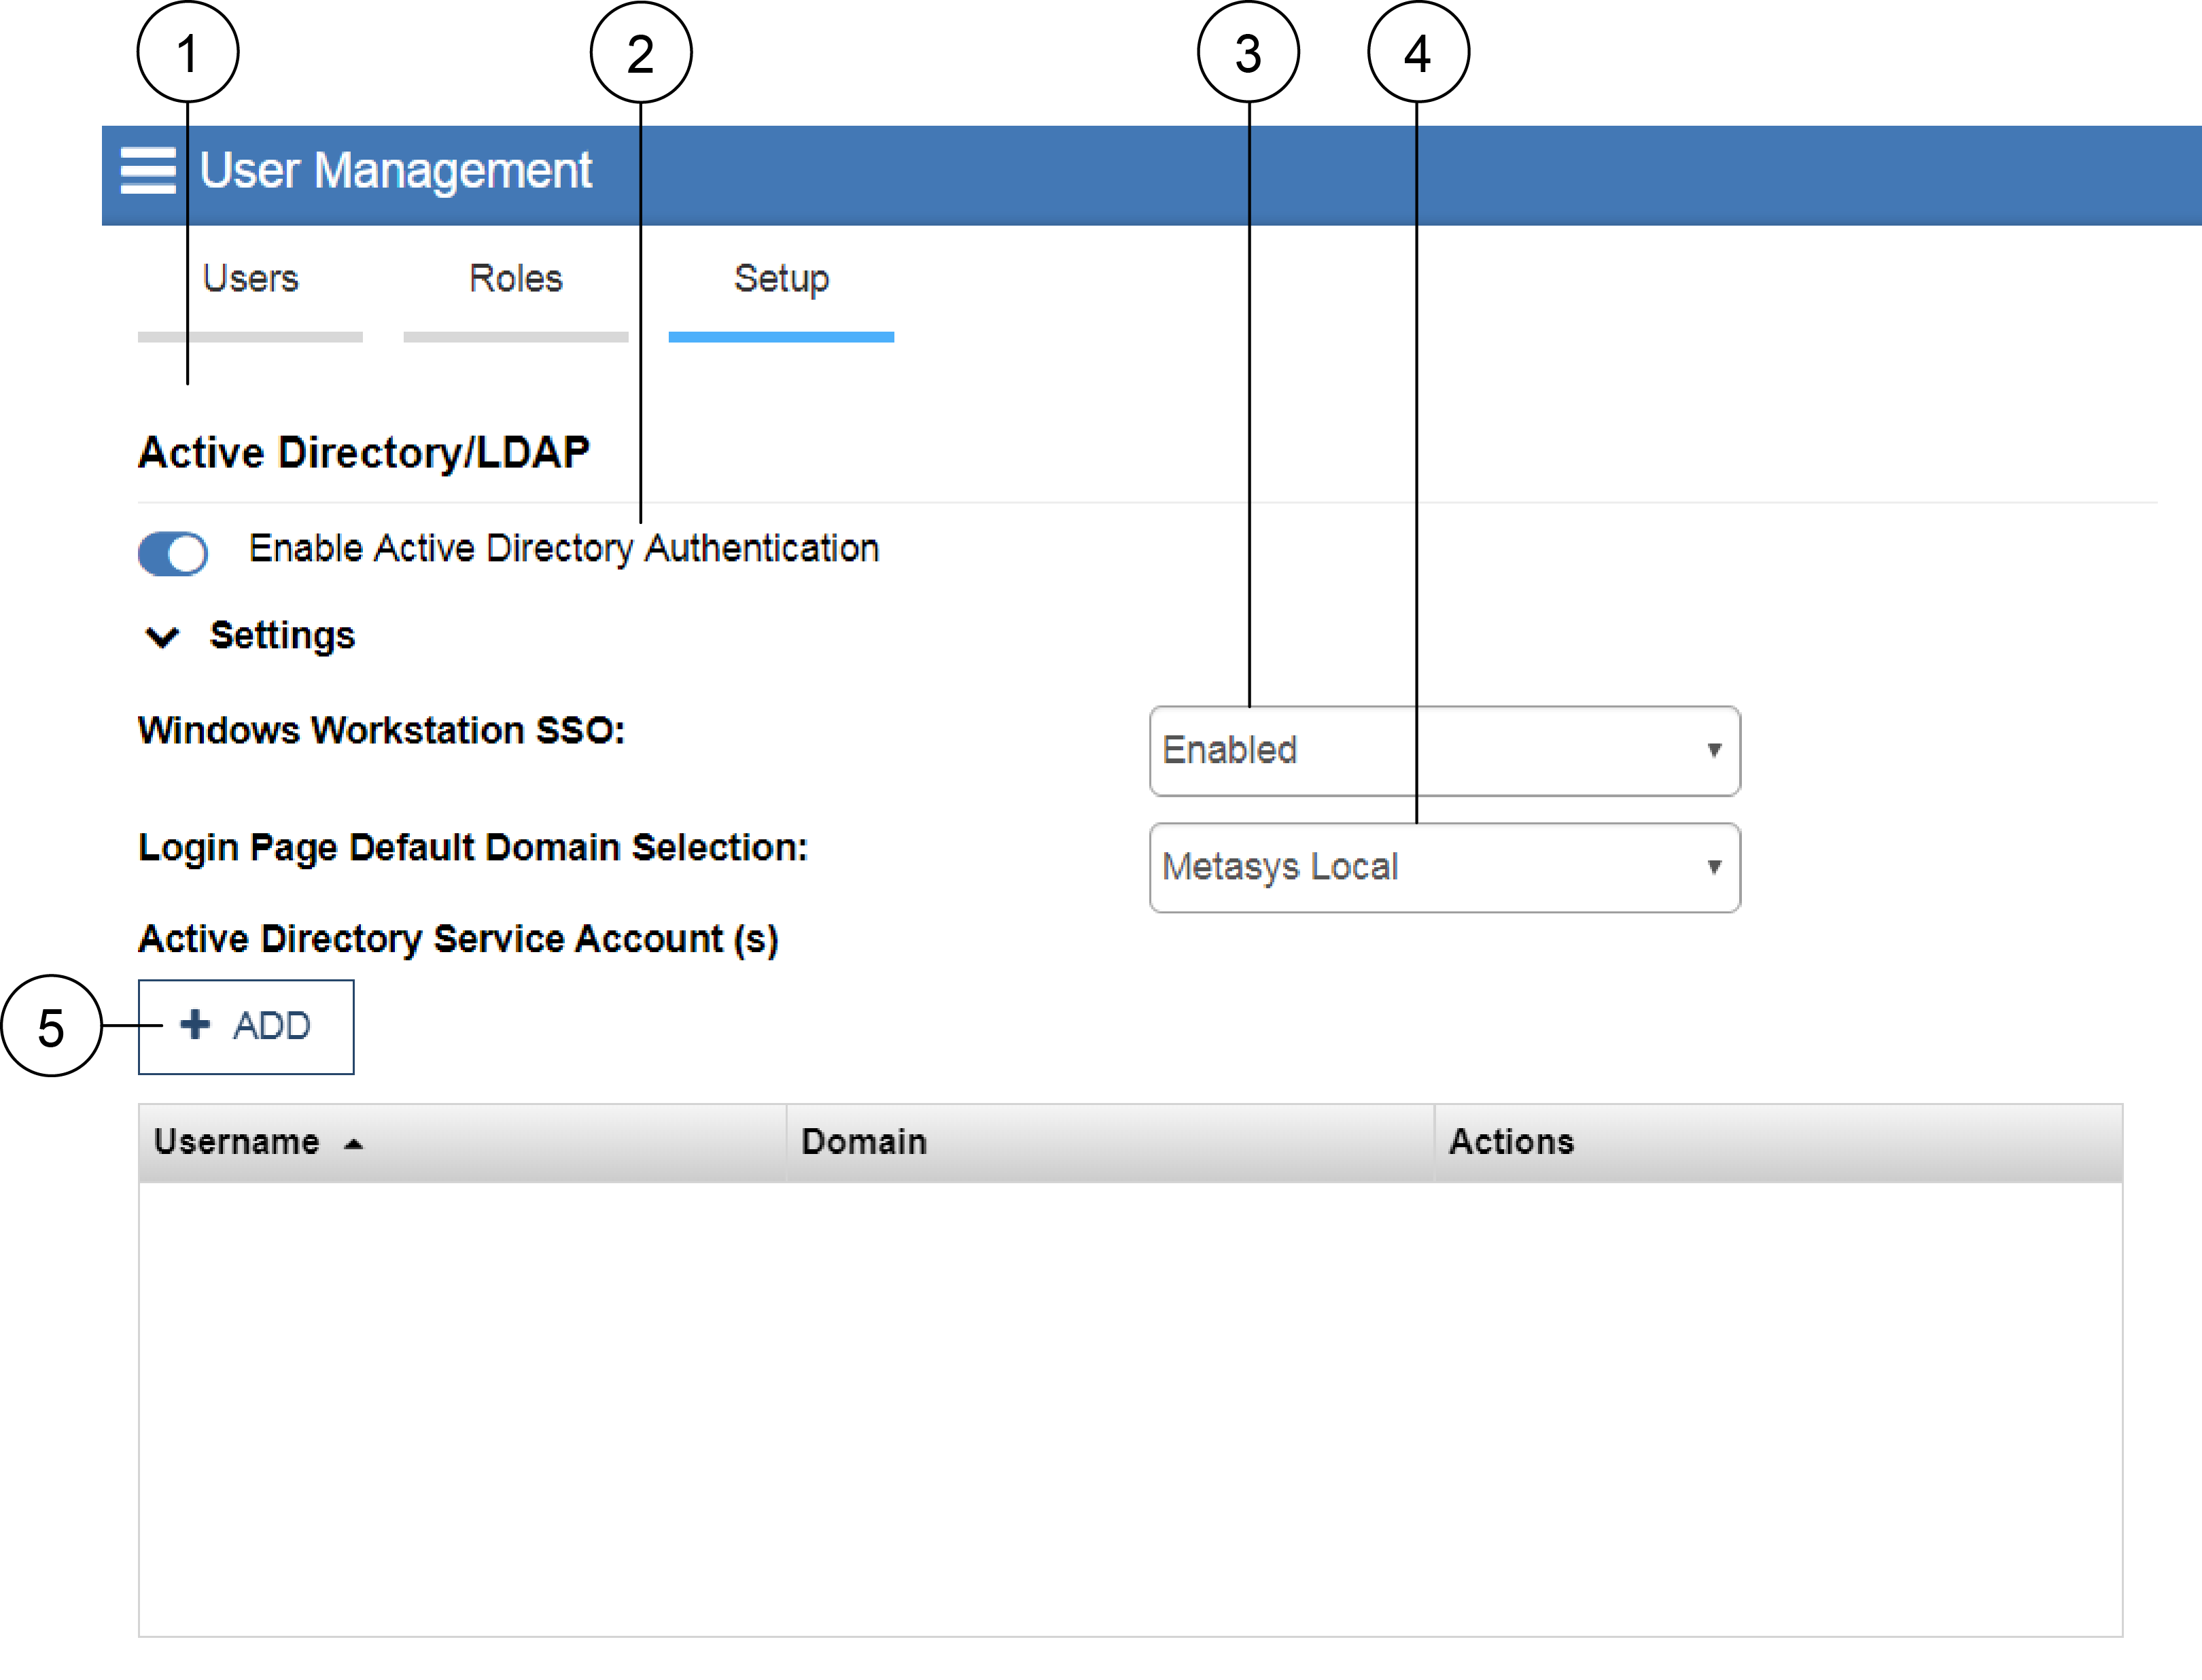
| Number | Name | Description | |
|---|---|---|---|
| 1 | Active Directory/LDAP authentication type | This authentication type is listed in the upper half of the Setup window. Any saved changes to this section are recorded as audits. | |
| 2 | Active Directory Authentication toggle | Use the toggle to enable or disable Active Directory Authentication. | |
| 3 | Settings: Windows Workstation SSO field | Expand the Settings to see this field. Enable or disable Windows Workstation Single Sign-On (SSO) for Site Management Portal (SMP). | |
| 4 | Settings: Login Page Default Domain Selection | Expand the Settings to see this field. Specifies the default domain selection for the login page. | |
| 5 | Settings: Active Directory Service Account(s) section | Expand the Settings to see this field. Specifies the Active Directory Service accounts, with the respective username, domain, and actions. When you tap or click + ADD, the Active Directory Service Account window opens. You must enter a username, domain, password, and then verify the password to add a new account. | |
Metasys UI Release 5.0 introduces the licensable ADFS for AD Integration and 2FA feature. This feature provides Metasys support for Microsoft® Active Directory Federation Services (ADFS), including two-factor authentication (2FA) when the ADFS Server is configured for 2FA. When ADFS authentication is enabled, Metasys UI Online users with an Active Directory Metasys user account will have a way to authenticate through their company-provided sign-in process (with their organizational account) rather than entering their credentials into the Metasys UI Login page. This provides an opportunity for a single sign-on (SSO) experience for Metasys UI users when the required SSO conditions are met. It also provides the ability for the organization (customer) to enforce two-factor authentication for Metasys UI Online users.
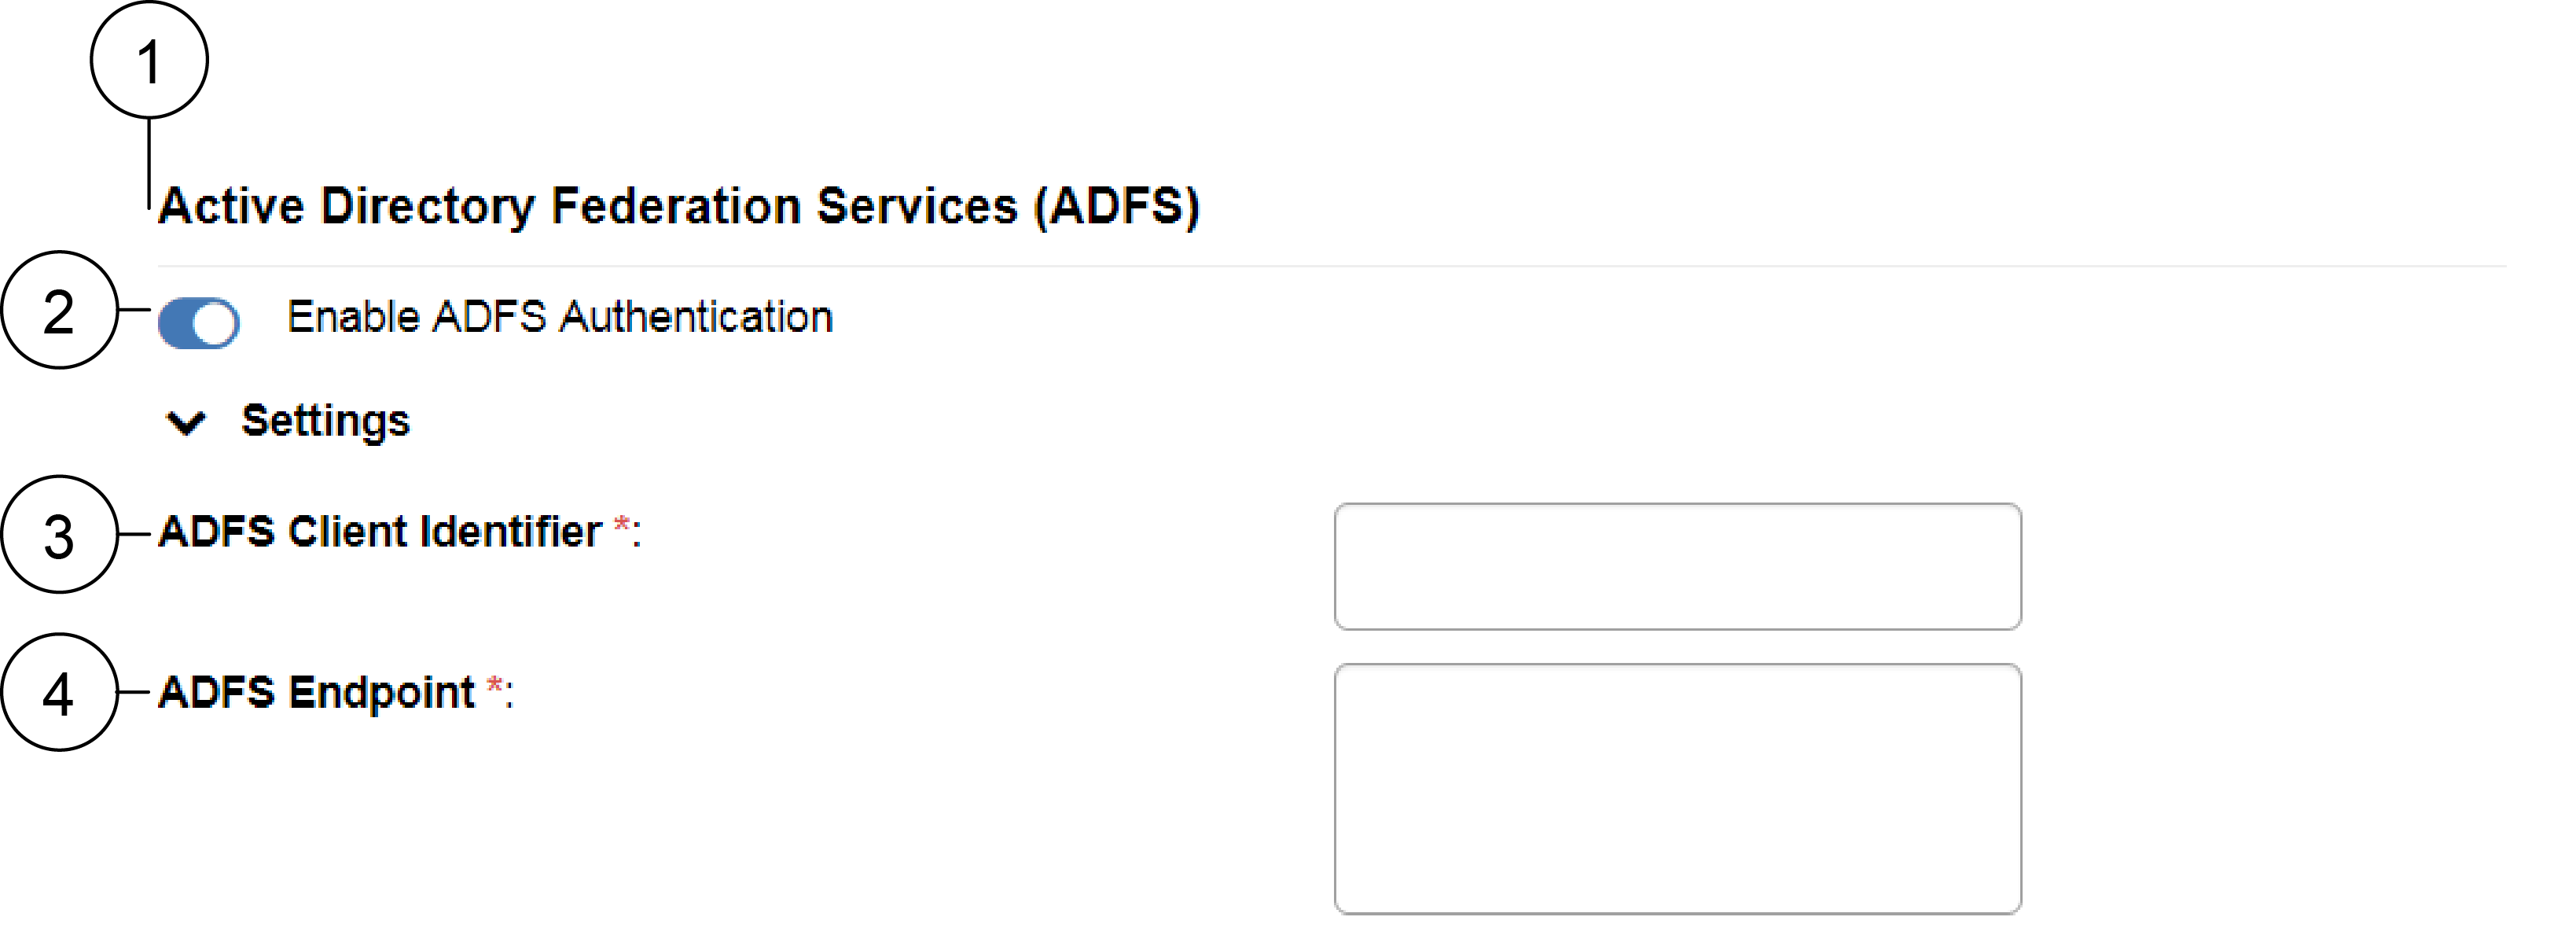
| Number | Name | Description | |
|---|---|---|---|
| 1 | Active Directory Federation Services (ADFS) authentication type | This authentication type is listed in the bottom half of the Setup window. Any saved changes to this section are recorded as audits. | |
| 2 | ADFS Authentication toggle | Use the toggle to enable or disable Active
Directory Authentication. Note: When ADFS is enabled for Metasys UI Online, but Active
Directory/LDAP authentication is disabled, users are not
able to log in to SMP with an Active Directory Metasys user account. Under those
circumstances, users are able to log in to SMP with a local
Metasys user account
only.
|
|
| 3 | Settings: ADFS Client Identifier | Expand the Settings to see this field. The Client Identifier is an ADFS-generated globally unique identifier (GUID). It is generated when you configure the ADFS server. Copy the Client Id into the ADFS Client Identifier field. See Where do I find the ADFS Client Identifier? for more information. |
|
| 4 | Settings: ADFS Endpoint | Expand the Settings to see this field. The endpoint is
a server URL ending in Note: Metasys UI will not validate that the ADFS
server is reachable, but an Administrator can check this
with a standard browser. See How do I validate the ADFS Endpoint? for more information.
|
|
Where do I find the ADFS Client Identifier?
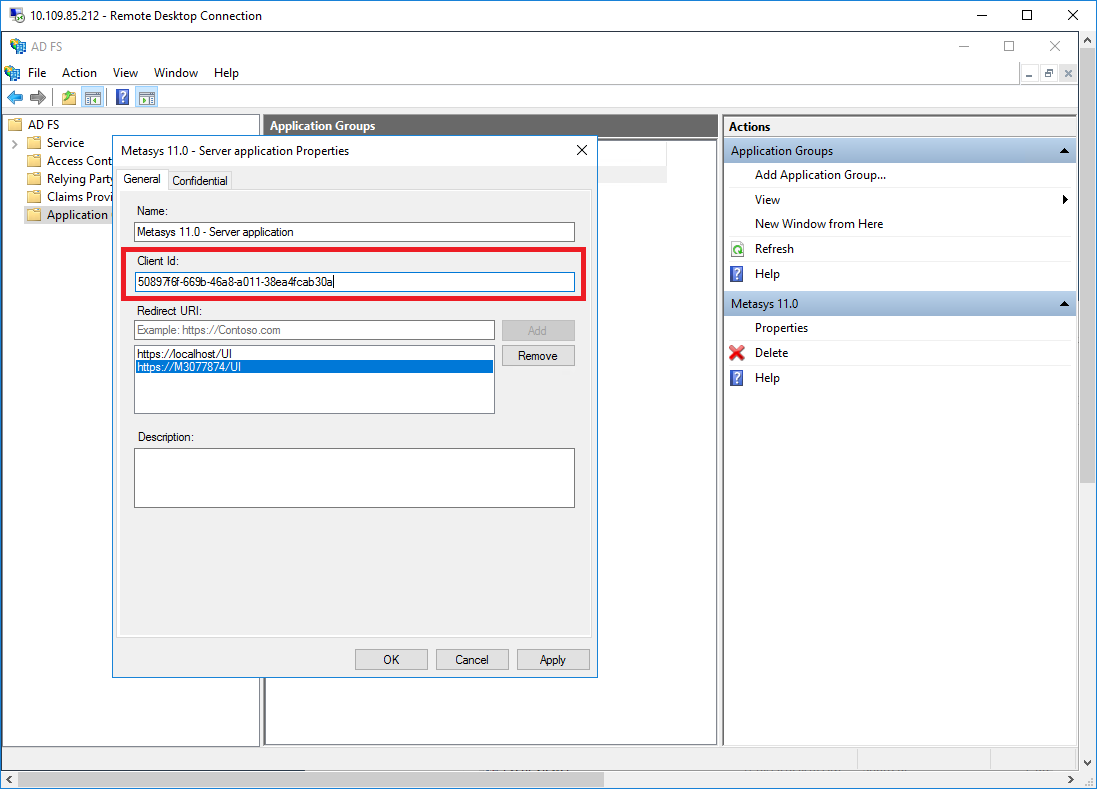
Refer to the Network and IT Guidance Technical Bulletin (LIT-12011279) for detailed instructions about how to configure the ADFS server for a Metasys site.
How do I validate the ADFS Endpoint?
The ADFS Endpoint is a server URL ending in /adfs, for example:
https://mui01-win16.corp.contoso.com/adfs.
/ls/idpinitiatedsignon. For example,
https://mui01-win16.corp.contoso.com/adfs/ls/idpinitiatedsignon. This also allows you to test your Active
Directory login.Set-AdfsProperties
-EnableIdpInitiatedSignonPage $true
How do I use filters in the User Management feature? What filters are available?
On a desktop platform and on a tablet, you can use filters in the Users tab and in the Roles tab.
- Tap or click FILTER in the upper-right of the Users tab or Roles tab.
- Select the filters you want to apply.
- Tap or click APPLY. A green check mark appears next to the filter type(s) you selected in the filter dialog and next to the FILTER button on the main window.
- To clear unwanted filters, clear the check boxes you selected and tap or
click APPLY. After the filters are cleared, the green
check mark disappears.Note: In the Last Login filter, click on Select Range, then APPLY to clear the filter.
On a smartphone, you can use filters in the Users screen and in the Roles screen. You can change the screen by clicking on the drop-down in the upper-left of the phone screen.
- Tap FILTER in the upper-right of the Users screen or Roles screen.
- Select the filters you want to apply.
- Tap APPLY.
- To clear unwanted filters, clear the check boxes you selected. To clear all
filters tap Clear All in the upper-right of the
screen. Then tap APPLY. Note: In the Last Login filter, click on Select Range, then APPLY to clear the filter.
| Tab | Filter name | Description |
|---|---|---|
| Users | Role | Search and select a role from the
list. Note: You can choose a maximum of ten
roles. |
| Type | Select a type from the list. You can select multiple types. | |
| Last Login | Select a time range from the list.
Note: Select Marked Dormant to filter
for dormant users. |
|
| Status | Select a status from the list. You can select multiple status options. |
| Tab | Filter name | Description | |
|---|---|---|---|
| Roles | System Privileges | Search and select from the following system privileges: | |
|
|
||
| Access Categories | Search and select a maximum of ten from the following access categories: | ||
|
|
||
| Permissions | Search and select from the following permissions: | ||
|
|
||
How do I create a new user in the User Management feature?
- Open User Management.
- In the default tab (Users), tap or click +
USER. The Create New User window
opens. Note: On a smartphone, tap + to create a new user.
- Select the user type from the Type list. Selectable user types include Metasys and Active
Directory users. Note: You can select Active Directory from the Type list only if at least one of the following Active Directory authentication types is enabled in the Setup tab in User Management: Active Directory/LDAP authentication or Active Directory Federation Services (ADFS) authentication.
- Enter a username in the mandatory Username field.
- Enter a password in the mandatory Password field.
Review the password rules listed on the right of the Create New
User window. Note: On a smartphone, tap the information icon next to Password to review the password rules.
- Confirm the password in the Confirm Password field.
- Select a user role from the Role list. Note: You must assign at least one role to a user.
- Tap or click CREATE AND EDIT to create the user and further edit the user details. Or, tap or click CREATE AND CLOSE to create the user with the details you entered.
How do I create a user in the User Management feature who can access the public Application Programming Interface (API)?
Users with access type Standard or Tenant cannot get data from APIs. Only users with access type API can access the public APIs, such as alarms and trends. To create an API user, complete the following steps:
- Log in to Metasys UI as an Administrator.
- Open User Management.
- In the default tab (Users), tap or click +
USER. The Create New
User window opens.Note: On a smartphone, tap + to create a new user.
- Complete the fields in the Create New User window. See How do I create a new user in the User Management feature? for more information.
- Tap or click CREATE AND EDIT to create the user and further edit the user details.
- In the User Details tab, select API from the Access Type drop-down menu.
- Tap or click SAVE.
- Log out of Metasys UI.
- Log in to Metasys UI with the API user details.
- Change the password if prompted.
- Accept the terms and conditions.Important: Accepting the terms and conditions is an important step. The API user cannot access the public API otherwise.
How do I edit a user? What are my edit options?
- Open User Management.
- In the default tab (Users), tap or click the Edit User icon in the Actions column. The edit user window opens.
You can edit the user details in the User Details (default) tab:
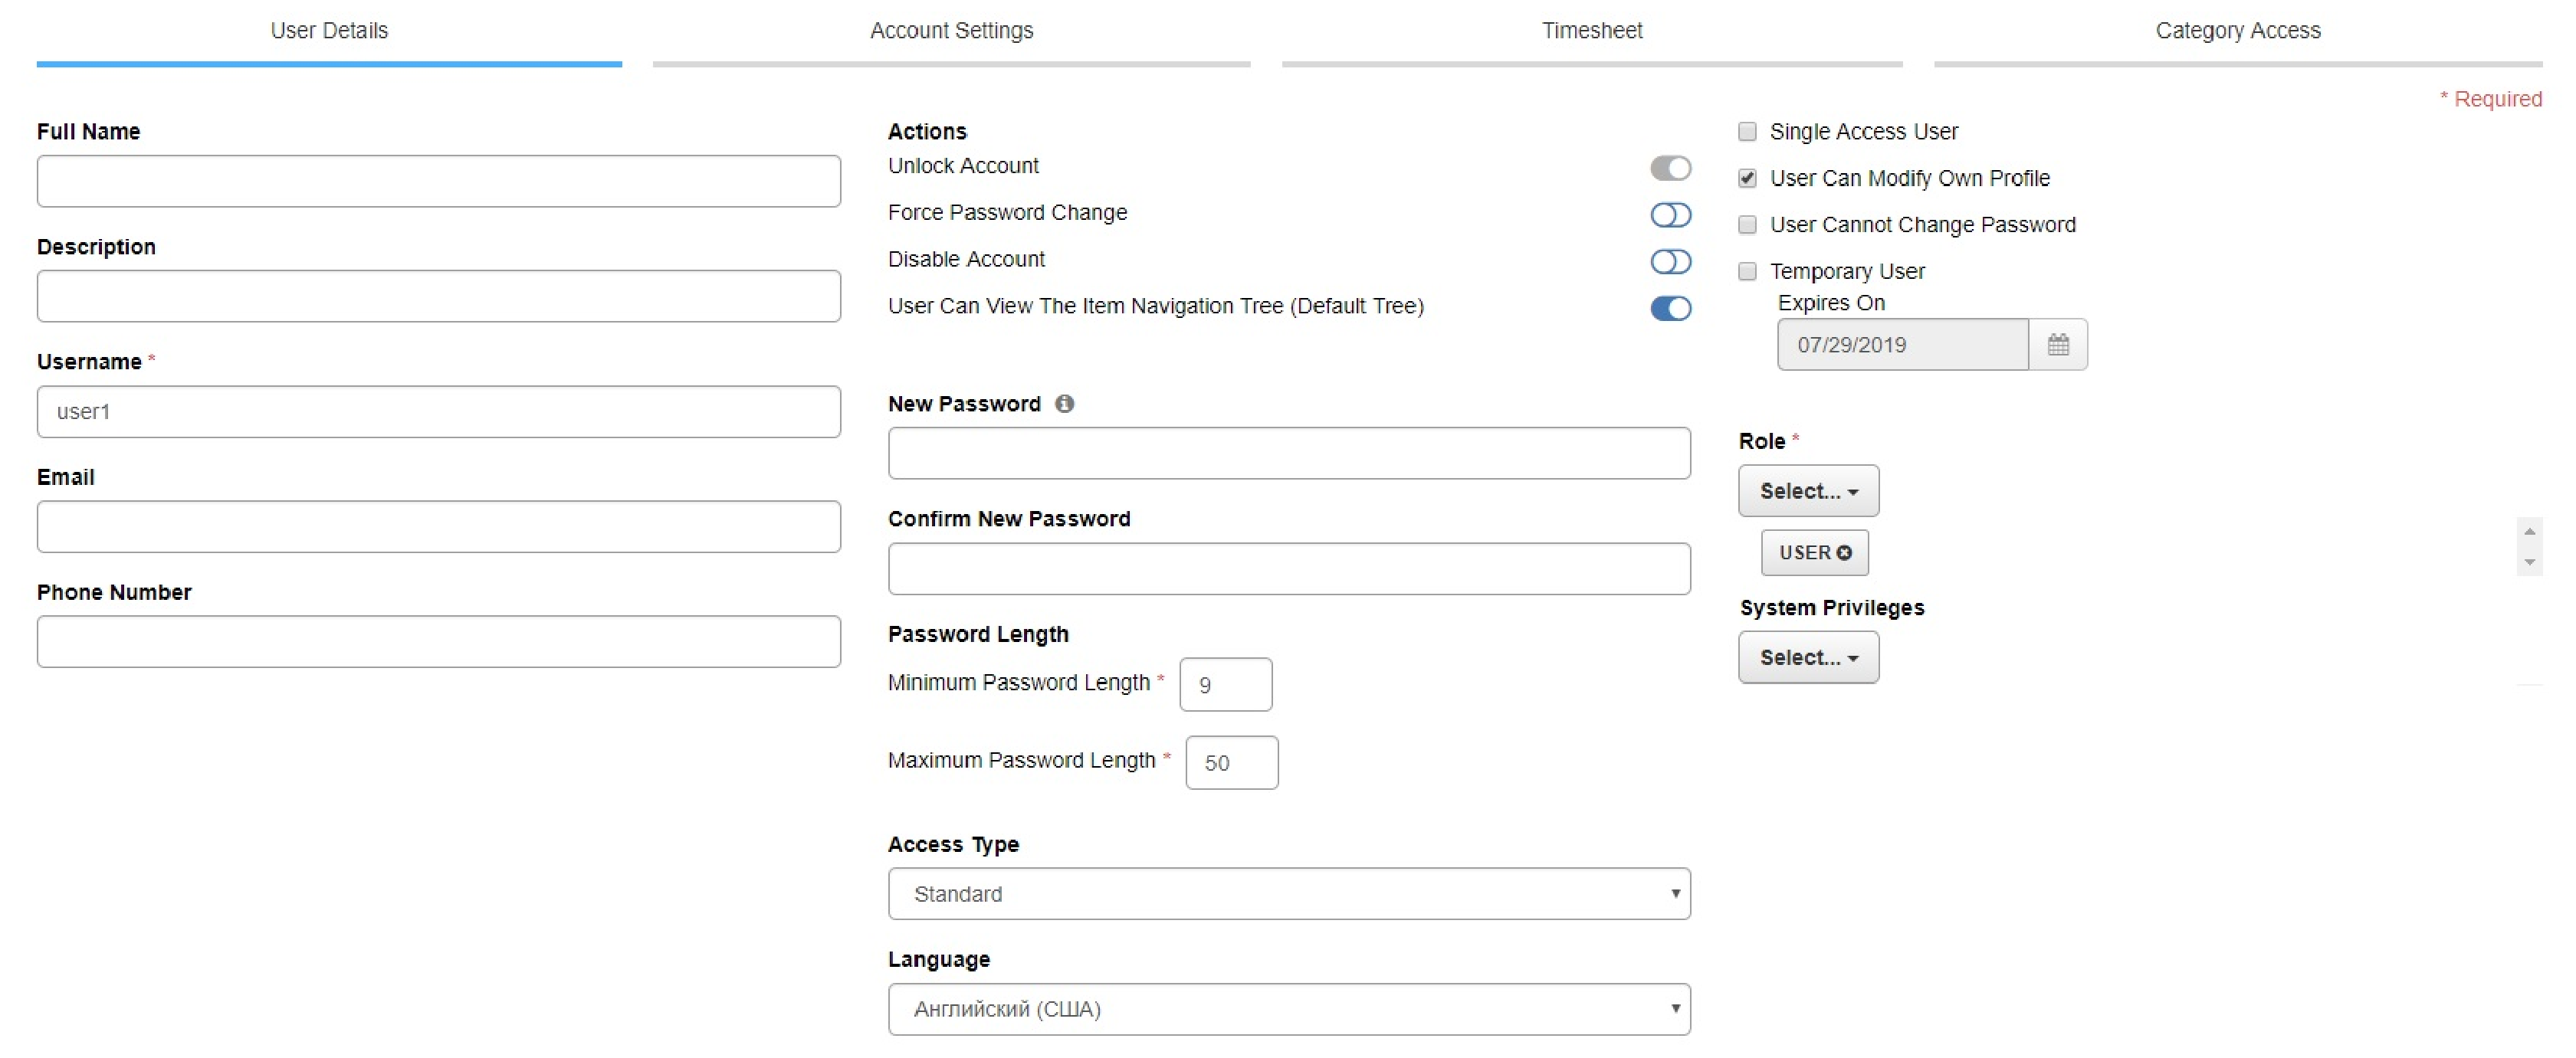
- Edit the name and contact details. Username is a mandatory field.
- Tap or click the toggle to edit the items listed under Actions.
- Edit the password, confirm the new password, and set the password length. Tap or click on the information icon beside New Password to view the current password policy.
- Edit user access details. Note: When you select Single Access User, the other check boxes are disabled. When you select Temporary User, use the date field with the calendar icon to set an expiration date.
- Edit the role by selecting a role from the Role list. For example, you can select Administrator, Maintenance, Operator, or User. You can select multiple options. Role is a mandatory user detail.
- Edit the system privileges by selecting system privileges from the System Privileges list. You can select from Manage Devices & Sites, View Metasys Status, Discard Acknowledged Events, Discard All Events, Snooze All Events, Manage Audit History, Clear Audit History, System Configuration Tool, Schedule Reports, Advanced Reporting. You can select multiple options.
- Tap or click SAVE to save your settings and exit the User Details tab, or tap or click CANCEL to exit the tab without saving your changes.
You can edit the account settings in the Account Settings tab.
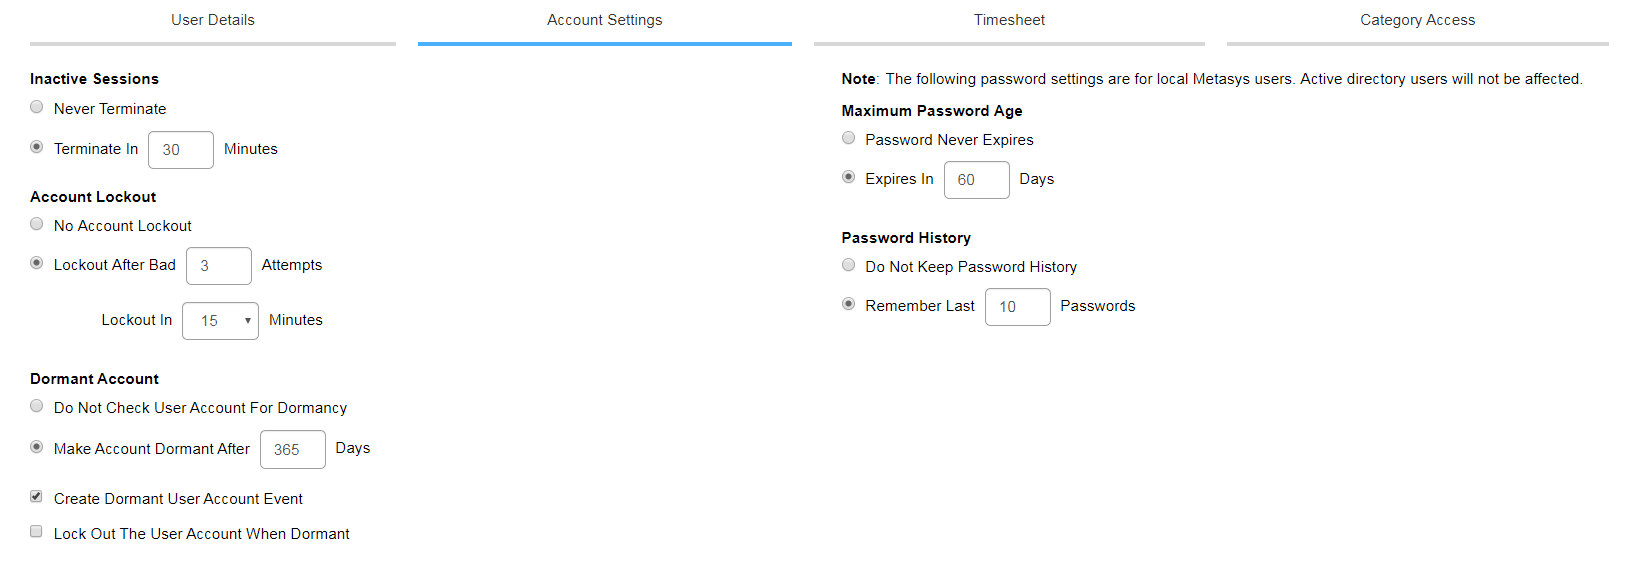
- In the Inactive Sessions section, choose to never terminate a session, or choose to terminate a session after a certain time range.
- In the Account Lockout section, choose not to have any account lockout, or choose to activate lockout after a given number of sequential bad attempts within a certain time range.
- In the Dormant Account section, choose not to check user account for dormancy, or enter a number of days after which an account is made dormant. You can also choose to create a dormant user account event and to lock out the user account when dormant.
- You can edit the password settings for local Metasys users. In the Maximum Password Age section, choose to have no expiration for passwords, or enter a number of days after which a password expires. In the Password History section, choose not to keep the password history, or enter a number of passwords for the system to remember.
- Tap or click SAVE to save your settings and exit the Account Settings tab, or tap or click CANCEL to exit the tab without saving your changes.
You can edit the permitted access times of a user in the Timesheet tab.
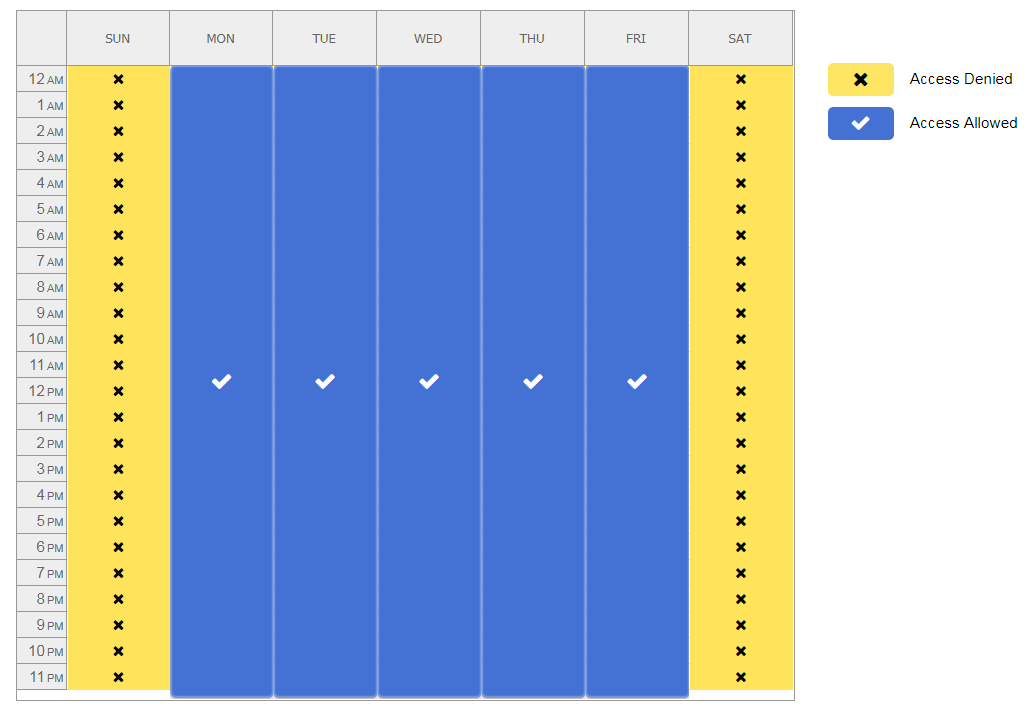
A time slot during which access is allowed appears on a blue background with a white check mark. A time slot during which access is denied appears on yellow background marked with an x. In the sample figure above, you can see that access is denied on Saturdays and Sundays, but allowed during the rest of the week.
- To change the selection, tap or click on the desired time slot. You can use the arrow to drag your selection vertically to expand the access time slots.
- Tap or click SAVE to save your settings and exit the Timesheet tab, or tap or click CANCEL to exit the tab without saving your changes.
You can edit the category access details in the Category Access tab.
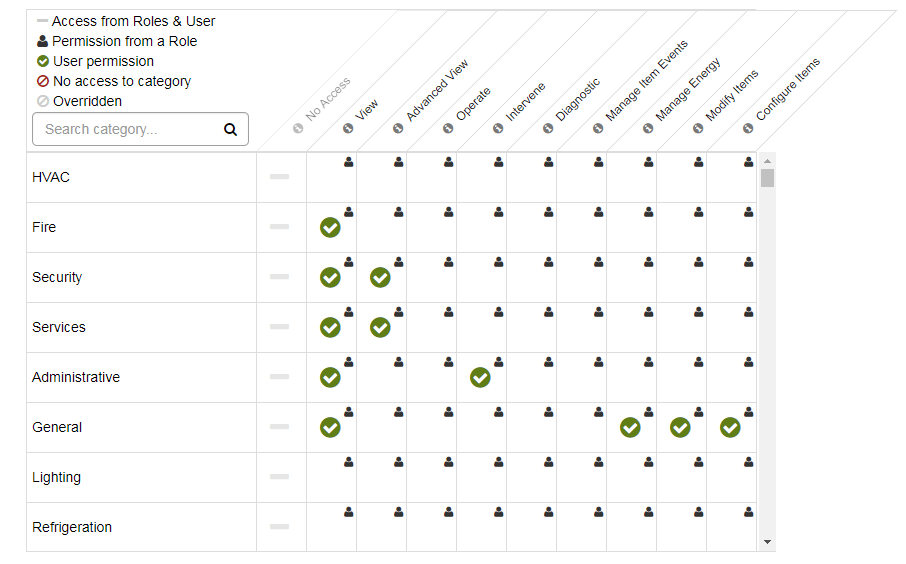
The categories are listed vertically on the left. Categories include HVAC, Fire, Security, Services, Administrative, General, Lighting, Refrigeration, Critical Environment, Air Quality, Power, Energy, System, and Custom 1 through 150. The permissions are listed horizontally at the top of the table. Tap or click the information icon to learn more about the permissions, or see Table 8. The following table describes the Category Access icons in more detail:
| Icon | Name | Description |
|---|---|---|
| Access from Roles & User | Appears only in the No Access column. This setting means that the "No Access" setting does not apply to this user. The user has at least one role assigned that is providing a permission for this category. | |
| Permission from a Role | Denotes that the permission comes from one or more role(s) assigned to this user. | |
| User permission | Denotes that the permission is assigned directly to this user. | |
| No access to category | Appears only in the No Access column. This setting means that every role assigned to the user has No Access for this category, and the user has no permissions overriding the role(s) setting. | |
| Overridden | Appears only in the No Access column. This setting means that every role assigned to the user has No Access for this category, and the user has at least one permission overriding the role(s) setting. |
- To grant permission for a user, tap or click on the desired permission. A white check mark on a green circle appears. To remove a user-assigned permission, click the icon.
- Tap or click SAVE to save your settings and exit the Category Access tab, or tap or click CANCEL to exit the tab without saving your changes.
| Name | Description |
|---|---|
| No Access | The No Access column shows the combined settings for No Access from all of the user's roles and is disabled when assigning permissions to a user. |
| View | Gives the user the following
privileges:
Important: To snooze an alarm in the Alarm Bar, the
user must have View permission and Manage Item Events
permission. The Alarm Bar is a feature in SMP
only. |
| Advanced View | Gives the user the same privileges
as the View permission, in addition to the capability of editing
the advanced attributes for users with edit privileges. When not
selected, the Advanced option in all item views (for example,
Focus view) is disabled. Note: This refers to SMP only.
Metasys UI views do not have an Advanced View
option. |
| Operate | Gives the user the following
privileges:
|
| Intervene | Gives the user the following
privileges:
|
| Diagnostic | Gives the user the following
privileges:
|
| Manage Item Events | Gives the user the following
privileges:
Note: Applies to category-based events and allows the user
to display an alarm in the Alarms Window (also referred to
as Metasys - Events and Alarm Bar.) The Alarm Bar is a
feature in SMP only. |
| Manage Energy | Gives the user the following
privileges:
|
| Modify Items | Gives the user the following
privileges:
Note: When users modify items, they can only set the
Authorization Category property of a modified object to a
category for which they have Modify Items access
permission. |
| Configure Items | Gives the user the following
privileges:
Note: When users create objects, they can only set the
Authorization Category property to a category for which they
have configuration access permission. The functionality to
create objects is available in SMP only. |
How do I create a new role in the User Management feature?
You can create a new role on desktop platforms only.
- Open User Management.
- In the Roles tab, tap or click + ROLE. The Create New Role window opens.
- Enter a role name in the mandatory Role Name field.
Note: The following two special characters are not supported in a role name: at sign (@) and backslash (\).
- Enter a description in the Description field.
- Search for and select a user you want to assign to this new role from the Available section.
- After a user is selected, tap or click the right arrow to
add the user to the Assigned Users
section. Note: You can select multiple users at once by using the keyboard shortcuts Ctrl or Shift. You can also click and drag the mouse over the users to select multiple users.
- Tap or click CREATE AND EDIT to create the role and further edit the role details. Or, tap or click CREATE AND CLOSE to create the role with the details you entered.
How do I edit a role? What are my edit options?
- Open User Management.
- In the Roles tab, tap or click the Edit Role icon in the Actions column. The edit role window opens.
You can edit the role details in the Role Details tab.
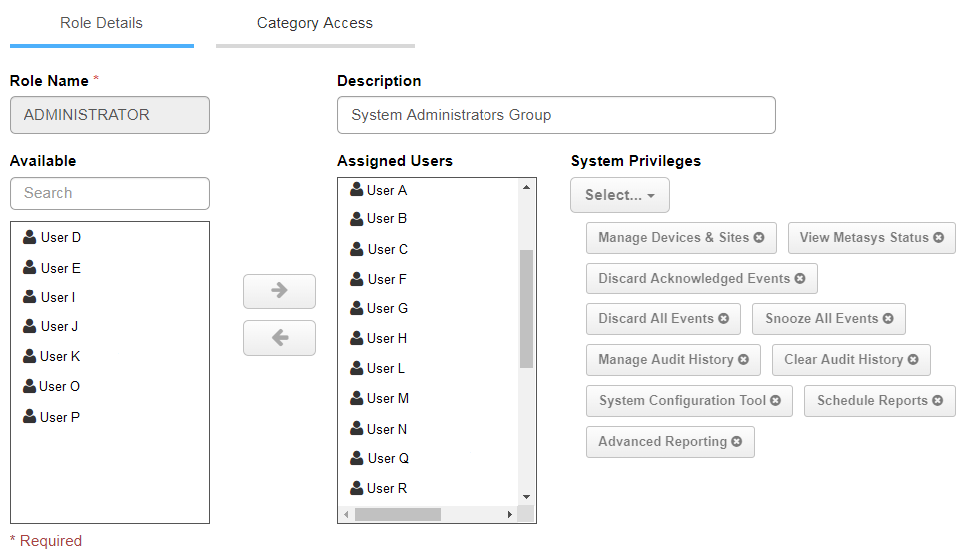
- Edit the role name in the Role Name field. Note: You cannot change the role name of certain roles, including Administrator and User. The following two special characters are not supported in a role name: at sign (@) and backslash (\).
- To add a user to the Assigned Users section, search
and select a user in the Available section and then
tap or click the right arrow to add the user. To remove a user from the
Assigned Users section, tap or click the left
arrow. Note: You can select multiple users at once by using the keyboard shortcuts Ctrl or Shift. You can also click and drag the mouse over the users to select multiple users.
- Edit the description in the Description field.
- Edit the system privileges in the System Privileges
section. You can select from the following system privileges:
- Manage Devices & Sites
- View Metasys Status
- Discard Acknowledged Events
- Discard All Events
- Snooze All Events
- Manage Audit History
- Clear Audit History
- System Configuration Tool
- Schedule Reports
- Advanced Reporting
Note: You cannot change the system privileges for the Administrator role. - Tap or click SAVE to save your settings and exit the Role Details tab, or tap or click CANCEL to exit the tab without saving your changes.
You can edit the category access details in the Category Access tab.
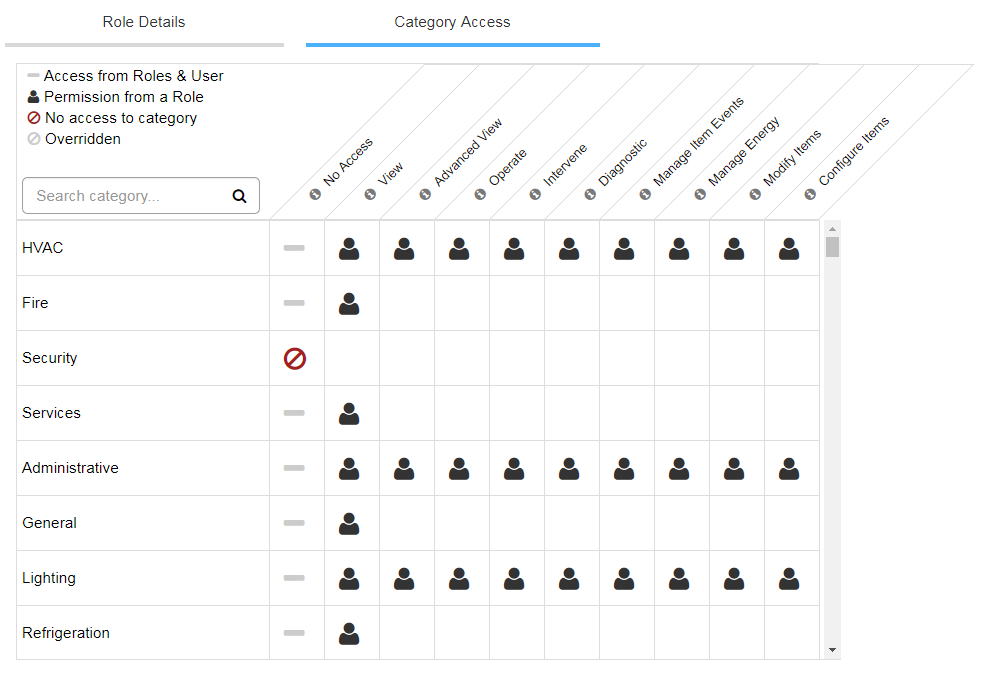
The categories are listed vertically on the left. Categories include HVAC, Fire, Security, Services, Administrative, General, Lighting, Refrigeration, Critical Environment, Air Quality, Power, Energy, System, and Custom 1 through 150. The permissions are listed horizontally at the top of the table. Tap or click the information icon to learn more about the permissions. For more information about permissions see Table 8. The following table describes the Category Access icons in more detail:
| Icon | Name | Description |
|---|---|---|
| Access from Roles & User | Appears only in the No Access column. This means that this role has one or more permissions assigned for this category, so that the No Access setting does not apply. | |
| Permission from a Role | Denotes that the permission is assigned to this role for this category. | |
| No access to category |
Appears only in the No Access column. Denotes that this role has no permissions assigned for this category. |
|
| Overridden | Will not appear for a role (does not apply). |
- To edit an active permission for the role, tap or click on the role icon. The role icon disappears.
- To add a new permission for the role, tap or click on an empty cell. The role icon appears.
- To deny access to a category, tap or click on the desired category within the No Access column. This removes all other permissions assigned to this role (clears the other cells) for the currently logged-in user.
- Tap or click SAVE to save your settings and exit the Category Access tab, or tap or click CANCEL to exit the tab without saving your changes.
Is the User Management feature supported on all devices?
Yes, the User Management feature is supported on desktop, tablets, and smartphones.

